Configuring sub-interfaces on a Cisco router in Packet Tracer allows VLANs to communicate with each other, providing segmented networks within a single physical connection. In this guide, we’ll set up a Cisco router (Router0) with sub-interfaces, allowing it to route traffic between VLANs while assigning static IP addresses to client PCs. This setup is common in networks that use VLANs to separate different departments, user groups, or services within an organization.
The network will include three VLANs: VLAN Default (VLAN-1), VLAN-2, and VLAN-3. The clients will use static IP addresses to connect to these VLANs.
Project Plan and Configuration Overview
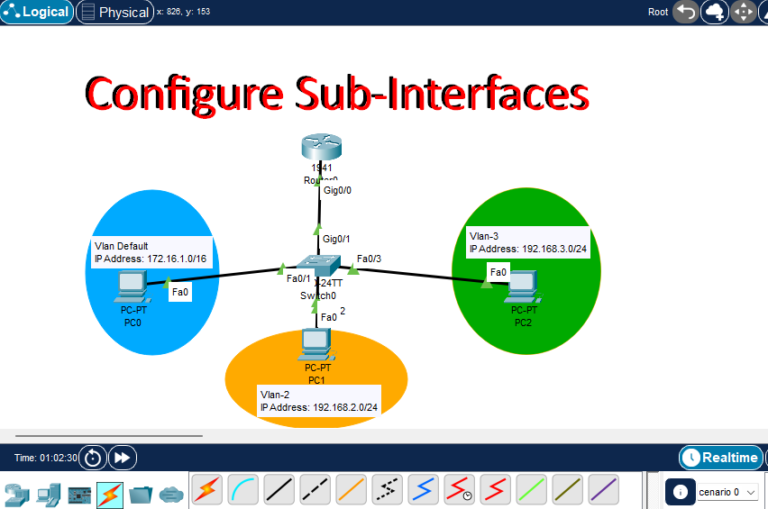
- Router (Router0): Configured with sub-interfaces for each VLAN.
- Router Interface Gi0/0: Trunk link connected to Switch0’s Gi0/1.
- Switch (Switch0): Configured with VLANs and ports assigned to specific VLANs.
- Switch Port Gi0/1: Trunk link connected to Router0’s Gi0/0.
- Switch Port Fa0/1: Assigned to VLAN-1 (Default).
- Switch Port Fa0/2: Assigned to VLAN-2.
- Switch Port Fa0/3: Assigned to VLAN-3.
- Clients: PCs with static IP addresses.
- PC0: VLAN-1 with IP 172.16.1.x/16
- PC1: VLAN-2 with IP 192.168.2.x/24
- PC2: VLAN-3 with IP 192.168.3.x/24
Step-by-Step Configuration in Cisco Packet Tracer
Right now, I am starting to configure or create all VLan on the Switch0 and set up port access and port trunk on Switch0.
1. Set Up the Switch (Switch0)
- Create VLANs on Switch0:
- Access Switch0 and go to the CLI.
- Enter global configuration mode:
enable configure terminal - Create the VLANs:
vlan 1 vlan 2 vlan 3 - Exit VLAN configuration mode.
- Assign Ports to VLANs:
- Configure Fa0/1 for VLAN-1 (Default):
interface fa0/1 switchport mode accessswitchport access vlan 1exit- Configure Fa0/2 for VLAN-2:
interface fa0/2 switchport mode accessswitchport access vlan 2exit- Configure Fa0/3 for VLAN-3:
interface fa0/3switchport mode accessswitchport access vlan 3exit- Configure Trunk Port on Gi0/1:
- Set Gi0/1 as a trunk port to allow VLAN traffic to the router:
interface gi0/1 switchport mode trunkexit
2. Configure the Router (Router0) with Sub-Interfaces
Now we configure on Cisco Router of Packet Tracer with Sub-Interfaces. Note that sub internet we need to configure the router only.
- Access Router0 and go to CLI mode:
enable
configure terminal- Configure Sub-Interfaces for Each VLAN:
- Sub-Interface for VLAN-1 (Default):
interface gigabitEthernet 0/0.1 encapsulation dot1Q 1ip address 172.16.1.1 255.255.0.0 exit- Sub-Interface for VLAN-2:
interface gigabitEthernet 0/0.2 encapsulation dot1Q 2ip address 192.168.2.1 255.255.255.0exit- Sub-Interface for VLAN-3:
interface gigabitEthernet 0/0.3encapsulation dot1Q 3ip address 192.168.3.1 255.255.255.0exit- Verify Interface Configuration:
- Exit configuration mode and check interface settings:
show ip interface brief
3. Configure Static IP Addresses on PCs
- PC0 (VLAN-1):
- Open PC0, go to Desktop > IP Configuration, and set:
- IP Address: 172.16.1.2
- Subnet Mask: 255.255.0.0
- Default Gateway: 172.16.1.1
- PC1 (VLAN-2):
- Open PC1, go to Desktop > IP Configuration, and set:
- IP Address: 192.168.2.2
- Subnet Mask: 255.255.255.0
- Default Gateway: 192.168.2.1
- PC2 (VLAN-3):
- Open PC2, go to Desktop > IP Configuration, and set:
- IP Address: 192.168.3.2
- Subnet Mask: 255.255.255.0
- Default Gateway: 192.168.3.1
4. Test Connectivity Between VLANs
- Ping Between PCs:
- Open Command Prompt on each PC and ping the router’s sub-interface corresponding to their VLAN:
- From PC0, ping 172.16.1.1
- From PC1, ping 192.168.2.1
- From PC2, ping 192.168.3.1
- To test inter-VLAN connectivity, try pinging PCs across VLANs:
- From PC0 to PC1’s IP (192.168.2.2)
- From PC1 to PC2’s IP (192.168.3.2)
- From PC2 to PC0’s IP (172.16.1.2)
- Successful pings confirm that the router is routing traffic between VLANs.

By configuring sub-interfaces on the router and assigning VLANs on the switch, we’ve enabled inter-VLAN communication for PCs with static IP addresses in separate VLANs. This setup demonstrates how VLAN segmentation can work with a single router interface and is a fundamental skill in network design. For students interested in further exploring networking, check out more tutorials on VLANs, subnetting, and routing concepts on How To Got (Cisco)!

